Videos by Andy Slye

Category: iOS (Page 3 of 5)

Apple iOS

Too Cheap for Spotify? Try This Free Music Streaming App

Free Music Streaming App (Spotify Alternative)

Musi (iOS – Free)

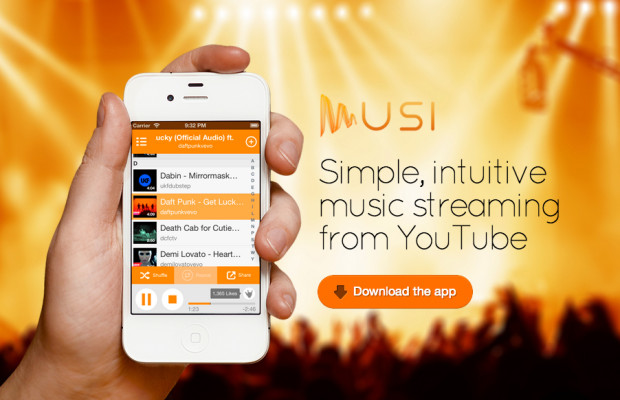
If you’re too cheap or lazy to pay for Spotify then there’s an app for that. Musi is a free app for the iPhone, iPad, or iPod. Musi basically turns YouTube into a music streaming app. Any video on YouTube can be streamed like an MP3 song with this app. Once you have the app, open it up, and tap the plus sign. This will take you to a YouTube search screen. It also has 4 categories: Most liked, Trending, Our picks, and Top charts. Most likely you’re just going to be using the search function here. Once you search for your artist or song name it will show you the results just like YouTube would show them on your computer.

If you want to add a song just tap on it. It gives you a little preview, and you can play the video to make sure that’s the correct song that you want to add. You can also see the video description as well. If you want to add it just tap “Add Song”. What that does is it adds it to your library. It doesn’t download it, but it just adds it to your library like a queue. When you go back, you should now see the song in your music library.

You can play all the songs in your library. It will stream them like a music streaming service, but it’s streaming them from YouTube and for free, Probably the best feature about this app is the fact that you can play the songs while the device is locked and while you’re closed out of the app. The songs and playlists do continue to play when you lock the device on this app. That’s why love it especially since it’s free. It’s like having an on-demand music streaming service, and it definitely comes in handy when you’re working out.

You can also create playlists. The cool thing is some people upload entire albums into one YouTube video. Go ahead and take advantage of all those people out there who are uploading copyrighted material to YouTube. Also you can change the streaming quality options. If you’re on Wi-Fi you can set it to where it will stream the highest quality version of the song by tapping the Concert quality button. If you’re streaming over 3G you probably just want to keep it on Basement which is the lowest quality but is the fastest and won’t use up all your data from your data plan. So if you’re looking for a free music streaming app this is definitely the app to get. It’s called Musi, and it’s free in the Apple App Store. Pass this along to all your friends, and they will definitely love you for it.

By Andy Slye

How to Backup iPhone, iPad, or iPod with iTunes (PC & Mac)

How to Backup iPhone, iPad, or iPod with iTunes (PC & Mac)

This video is going to show you how to backup your iPhone, iPad, or iPod to your computer using iTunes. This works on a Mac and a Windows PC. Backing up your iPhone, iPad, or iPod is an easy task, but I get a lot of questions about it so I figured I’d do a video for you guys. There are 2 main ways to backup your iPhone (or whichever iOS device you have). One way is to go on your iPhone itself, and go to Settings, iCloud, Backup. As long as you’re connected to a Wi-Fi network you can back up your iPhone to your iCloud account. The second way is what I do and what most people do, and that is to back up your iPhone to your computer using iTunes so I’m going to show you that today.

First, open iTunes then connect your iPhone to your computer using the USB cable. Most likely it’ll automatically backup your iPhone when you connect it so if you click on your iPhone in the devices list on the left hand side you can see when the most recent backup was on your computer. My iPhone automatically backs up whenever I connect it. If yours doesn’t do that you can manually back it up by clicking the “Back Up Now” button or you can go up to File, Devices, Back Up. Either way they both backup your iPhone to your computer.

If you want to view a list of recent backups just go to Preferences and go to Devices, and you can see all the backups that it has stored on your computer. If you want to see where these backups are stored on your computer just right-click and then choose Show in Finder if you’re on a Mac or Show in Explorer if you’re on a Windows PC. It will open up the folder where your iOS backups are stored.

What is all included in the iPhone backup when it backs up to your computer? Well pretty much everything that is not in iTunes is backed up. Now what I mean by that is your music, movies, TV shows, podcasts, books, apps, and ringtones are already in iTunes so those don’t get backed up to that backup folder. What does get backed up is your camera roll, your saved photos on your phone, your text messages, your iMessages, your contacts, your calendar, all your settings, app data, etc. All that data gets backed up during your iPhone backup. See the official iTunes backup details here.

If you want to restore an iPhone, iPad, or iPod to one of your backups all you have to do is connect that iOS device to your computer, open iTunes, and once it’s connected go to File, Devices, Restore from Backup. You can choose from your most recent backups to restore the device. So that’s how to backup your iPhone, iPod, or iPad to your Mac or Windows computer!

By Andy Slye

How to Download Free Music on iPhone, iPad, iPod – Free MP3 App

How to Download Free Music on iPhone, iPad, iPod

In this video you’ll learn how to download free music directly to your iPhone, iPod, or iPad without using a computer or jailbreaking. First, go on your iOS device and open up the App Store and search “free music”. You should see a list similar to this. The app that you want is a free app called MP3 Music Downloader Free by Webtechies. Tap on that and install it. Once it’s installed open up the Free MP3 icon, and you’ll see the homepage.

This is the home screen for the free MP3 music downloader app. This page gives you a list of resources for this app: how to use it, general questions, etc. If you want to go right into downloading free music it gives you some free legal music sites on the homepage. If you tap on Last.fm it brings up the Last.fm website which is a popular music website where you can download free legal music. You can search for a song or artist. Or just download a song right from the homepage. Tap on the Free MP3 button and you’ll see a window pop up asking if you want to download, open, or copy the link. You want to download the MP3 for free so just tap the red Download button. It’ll ask you to enter the song name. You can leave it the same if you want.

The free song download will start. You can go to your Downloads section and see it downloading. After it’s finished downloading you can tap it to start playing it with the audio player. But what if you want to download a free MP3 that’s not listed on Last.fm or any of the other free websites that it lists on the homepage? Well, you can go up to Google search and just search the artist name + the song name + “MP3” at the end. The first couple of search results are going to be an MP3 of that song that you should be able to download for free.

Any of the first few links should take you to an MP3 website. Find an MP3 result that has high bit-rate quality and has the correct song length. Then just tap the Download button. If the same windows from earlier pops up then you know it’s a downloadable MP3 file. Download and name it. That’s basically how you use this free MP3 app to download free music right from your iPhone, iPad, or iPod. You can add/edit playlists with this app as well. Any music that you download with this app you can play straight from within this app with its built-in audio player.

By Andy Slye

How to Put Movies on iPhone

How to Put Movies on iPhone – Copy DVD Movies to Your iPhone

Click here for Windows Download (WinX DVD Ripper Platinum Free Trial)
Click here for Mac Download (Mac X DVD Ripper Pro Free Trial)

In this video I’ll show you how to put movies on your iPhone. Instead of spending a bunch of money on the iTunes store and buying movies through iTunes, you can actually copy any movie from any DVD onto iTunes and then sync it to your iPhone. That’s what I’m going to show you how to do today.

To do this you’ll be using DVD copy software from a company called Digiarty. They make the best DVD copy software out there. It’s by far my favorite – very easy to use, fast, and high quality. The software is available for Windows and Mac. The first thing you want to do is click the link at the top of this description. If you’re a Windows user click the Windows download link. If you’re a Mac user click the Mac download link. That link will start an instant download of this program. Download and install the application from the link above, and you’ll be able to try it out for free. If you like it you can register for the full version right from the program itself and at a special discount.

Once you have this application installed, it’ll be called MacX DVD Ripper Pro for Mac users. It’ll be called WinX DVD Ripper Platinum for Windows users, but they both work exactly the same so you can follow along. Next, insert the DVD movie that you want to put on your iPhone into your computer’s DVD drive. Then click the DVD button at the top left of the application. The source DVD disc window will pop up, and you should see your movie’s title in the box then click OK. Once it loads your DVD movie you’ll see the output profile window pop up. Since we’re putting the movie on an iPhone you’ll choose Apple device then choose iPhone video, and then choose whatever iPhone model you have that you’re going to put the movie on.

It can put movies on any iPhone model: 3GS, 4, 4S & 5. Choose the “Recommended” option for your iPhone model then click Done. The program automatically selects the main movie file. You can see that Title 1 is selected. Go towards the bottom, and you’ll see a destination folder option. This is the folder where you’re going to copy the movie. If you click Browse you can choose any folder where you want to save the movie then click Open. Now all you have to do is click the Run button in the bottom right, and it will start copying the movie to your computer.

Once the copy is complete it shows up in the destination folder. In order to put the movie on your iPhone you have to put it into iTunes first. Open iTunes then go back to the folder that has the movie and drag-and-drop the video file into iTunes. The movie will be copied into iTunes, and you can verify it by going into iTunes into the Movies section. Finally, sync your iPhone with iTunes by plugging your iPhone into your computer via the USB cable. Once your iPhone shows up in iTunes click on it. Go to the top and click on Movies, and check the checkbox to “Sync Movies” then click Apply. The movie will be copied to your iPhone, and you’ll be able to watch it on your iPhone from the Videos app. That, my friends, is how to copy movies on your iPhone – the absolute best way to do it. Go ahead and give that a try. Enjoy having your favorite movies on your iPhone!

By Andy Slye

How to Free Up Space on iPhone, iPad or iPod Touch

iOS Quick Tip: How to Free Up Space on iPhone, iPad or iPod Touch

Here’s a quick tip for all you iOS users out there. This is how to free up space on an iPhone, iPod, or iPad – instantaneously. So if you ever find yourself running low on storage space on your iOS device, have no fear. It’s really easy to free up space. First go into your Settings, then tap General, and then go to your Usage. Here it’ll populate a list of all the apps that you have installed on your iOS device and how much space each app is taking up. It’s listed by putting the app that uses the most space on top. Music is listed first on mine because it’s using up the most.

What you want to do here on this list is find apps that you can delete then immediately reinstall to free up a lot of space. For example, I’m not going to delete my music or podcasts, but I can delete Facebook because it’s using up 147 unnecessary megabytes of data. The original app size is only 57 MB, which means it’s using up 147 MB of cached files. To free up this space, hit Delete App then Delete App again, and it frees up 150 MB (on mine). So go through your apps and look for apps that are taking up at least 100 MB of storage space.

Almost all the social networking sites are big culprits of this. They take up a ton of unnecessary space. Each time you look at your Instagram feed it saves huge cache files to your device. The app size originally is only 21 MB so it’s taking up 134 MB of unnecessary space on my iPhone. I can delete this app just like with Facebook. Vine does it bad too. It’s taking up 100 MB so I’ll delete that app as well.

Once you delete those apps, all you have to do is go back into your App Store and reinstall those apps that you just deleted. They will download and reinstall in the same exact location that they were before. So if you had it in a folder it’ll go back into that folder, and you won’t lose any of the app settings that you had. That is how to free up space on an iPhone, iPod, or iPad. Go ahead and try that out, and let me know how much space you freed up using that method.

By Andy Slye

« Older posts Newer posts »

© 2023 My Tech Methods

Theme by Anders NorenUp ↑