Videos by Andy Slye

Category: Jailbreak

Jailbreak

How To Jailbreak iOS 7 Untethered with Evasi0n (iPhone, iPad, iPod)

This video shows you how to jailbreak iOS 7 on an iPhone, iPad, or iPod. The first step is to connect your device (your iPhone, iPad, or iPod) to your computer, and when iTunes opens select “Back Up Now” to make a backup of your device. It’ll only take a few minutes. Step number two is to restore your iPhone, iPad, or iPod to the latest iOS version (during this video it’s 7.0.4). While it’s connected to iTunes click the “Restore” button. As long as you just made that successful backup you can click “Restore and Update” and it’ll restore to the latest version of iOS so you can do the jailbreak. Restore your device from the most recent backup that you just did.

Next, go on your device and disable any passcode lock that you have on it if you have one. You can re-enable it once you’re done with the jailbreak. After you’ve disabled your passcode lock, go on your computer and visit evasi0n.com and download the jailbreak application for your operating system, Mac or Windows. Click the Download button to download it to your computer then double-click the application to run it. Make sure that your iPad, iPhone, or iPod version is supported by the jailbreak.

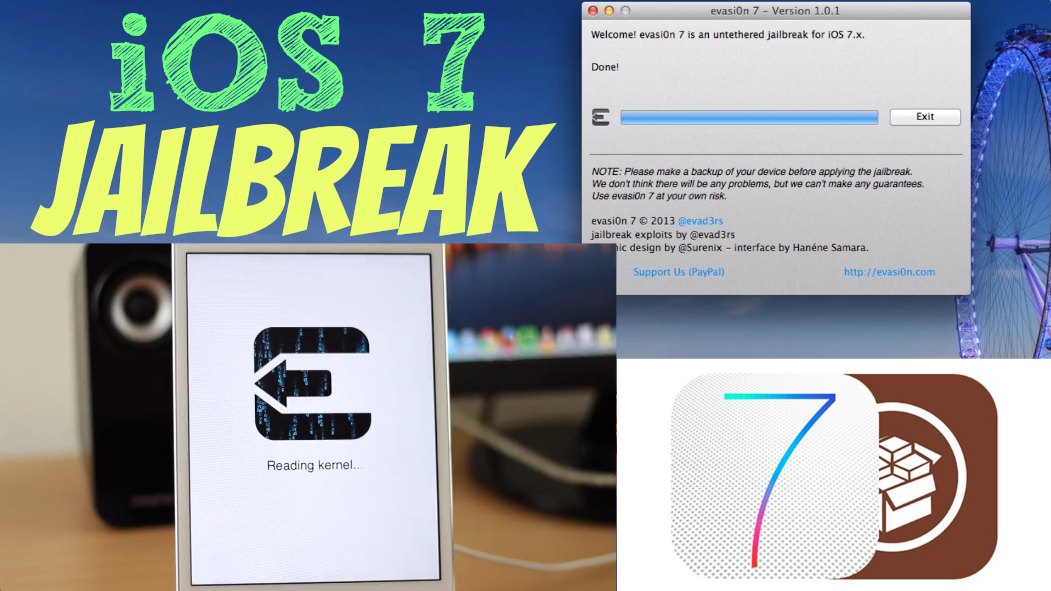
If you don’t already have your device connected to your computer go ahead and do that right now. Let it sync to iTunes, and then once it’s connected click the jailbreak button. The jailbreak process will begin, and it will take a few minutes to complete. During the jailbreak process your device will reboot several times. When it says to, continue by unlocking your device and tap the new evasion 7 icon. It’ll come up and go right back down and reboot. The device will reboot one last time, and evasi0n says that it’s done. After the final reboot you will see evasion complete some final tasks while it completes the jailbreak.

Now you can go into your device and go to the last page and you should see Cydia. Tap on it to open it. It’ll prepare the file system. Once your device re-springs it’ll come back up. Go back into Cydia one last time then choose User. Complete any upgrades if available. Your iOS 7 device is now jailbroken! You can go into Cydia and start adding all the tweaks and apps that you want. Enjoy!

By Andy Slye

What is Cydia? How to Use Cydia After Jailbreaking


So you’ve just jailbroken your device and want to know more about Cydia. In this video I’ll explain what Cydia is and how to use Cydia so you can customize your iPhone, iPad, or iPod Touch!

Cydia is basically the App Store for a jailbroken device. It’s like the secondary App Store where you can get third-party custom apps after you jailbreak. Jailbreaking is the only way to get Cydia on your iOS device. Cydia is where you download, install, and manage everything for your jailbroken device.

A good analogy is to look at your device as a town, and this town has a mall. This “mall” is where you get everything that you can put on your device and that mall is the Apple App Store. When you jailbreak your device it’s like getting an extra mall put in that town. So now you have the old mall (the Apple App Store) and the new mall (Cydia). Cydia is where you can get everything that the old mall does not offer.

The Cydia app’s home screen has all kinds of different information and you can see a list of featured and popular apps for jailbroken devices that you can get through Cydia. It also has a User Guide section where you can learn more about Cydia and jailbreaking. Also from the home screen you can manage your Cyda account.

The Sections area lists the categories of everything that’s offered through Cydia – all the apps, all the tweaks, and all the themes. To install an app or tweak or theme from Cydia just tap on a Section, then tap on an app and tap the Install button on the top right.

The Changes section is where you can see all the upgrades and updates for all your apps that are offered by your sources that are installed on your device. It’s basically like the Updates section in the regular Apple App Store.

The Installed section is where you manage all your apps that are installed on your device via Cydia. Here you can reinstall or remove any app by tapping on it and clicking the Modify button in the top right hand corner.

A Source is also called a Repo or repository. If Cydia is a “mall” then the Sources are the individual stores within that mall. Cydia comes with default Sources installed where you can get almost any app. But if there’s an app out there that comes from a different source you can add it within the Sources section. Sources are basically the host of every app that you can install. It’s where you download and install the apps from. So whatever source you have in Cydia you can get any app from that repo.

The Search area is where you can search for any app or tweak or theme within Cydia. It searches any repo that you have in Cydia. If the app is in blue text that means it’s a paid app. Black text means it’s free. Cydia accepts two different forms of payments, Amazon or PayPal.

Those are all the basic things you need to know about Cydia to get you up and running and installing apps and tweaks and themes and customizing your iPhone, iPad, or iPod!

What Is Jailbreaking? How a Jailbreak Works

What is jailbreaking? How a jailbreak is developed & how it works!
Subscribe on YouTube!

Video Transcript:
Most people with an iOS device (iPhone, iPad, or iPod Touch) have probably heard of the term jailbreaking. Maybe you’ve even jailbroken a device before. But what does jailbreaking actually mean, and what is the process behind it? Well today you’re going to find out in this jailbreaking edition episode of “What Is?”

To jailbreak means to gain the ability to install custom third-party apps on your device. It’s completely legal, but Apple does not want you to do it because they want to control the user experience. Now before we get into the jailbreak process, let’s learn how an iOS device boots up. The iOS bootup involves a series of signature checks that makes sure everything that’s being ran is approved by Apple. It happens in the following order: BootROM, BootLoader, Kernel, and iOS operating system.

The jailbreak itself involves obtaining control of the root and media partition of the device. This is where all iOS’s files are stored. And in order to be controlled, the “private/etc/fstab” must be patched. FSTab controls the permissions of the device’s root and media partition. The main problem is not getting the modified code in but getting it through certain checkpoints. Apple put in these checkpoints to verify if a file is actually legit or if it’s from a third-party. Every file is signed with a digital signature, or key, and without it the file is useless.

Signature checks are the main roadblocks in the jailbreak process. While the kernel is loading there are tons of signature checks happening to make sure every file has been approved by Apple.

The main objective for a jailbreak is to either patch the checks or bypass them. So this brings us to the two main exploit categories.

The first is the BootROM Exploit. This is done during the BootROM, and it can’t be patched by a normal update. Since this is before almost any checkpoint, the modified code is put in and this creates a gateway to bypass all the signature checks or simply disable them.

The second exploit is the Userland Exploit. This is done during or after the loading of the kernel, and it can easily be patched by Apple. Since it’s after all the checks, it puts the modified code directly into the openings and back into the kernel.

That is how jailbreaking works! If you’re not worried about voiding your Apple warranty or if you don’t even have a warranty, I would recommend trying jailbreaking out. It’s really easy!

© 2023 My Tech Methods

Theme by Anders NorenUp ↑