For all you current & soon-to-be owners, these are my favorite accessories for the Tesla Model 3!
Waterless Car Wash/Wax (Amazon)
This has a perfect 5-star rating on Amazon and was recommended to me by a fellow Tesla owner. The kit comes with everything you need including microfiber towels. You can use it with or without water. In less than 30 minutes you can have a clean & shiny Model 3.
Microfiber Bug Sponge (Amazon)
The Model 3 front end is a bug magnet. This Viking microfiber bug scrubber helps get the bugs off when washing the car. It has a mesh microfiber design that’s strong yet safe to use on the car’s clear coat. Plus it’s washable & reusable.
All Purpose Cleaner (Amazon)
CarGuys Super Cleaner is one of the best all-purpose cleaners and works great for the Model 3 interior. It can clean pretty much any surface except glass. You can use it on the dash, seats, steering wheel, middle console – almost anything inside the Model 3. It also comes with its own microfiber towel.
All-Weather Floor Mats (Amazon)
These ToughPro all-weather floor mats for under $100 will come in handy if you ever have passengers riding in your car. They are cut perfectly for the Model 3 and fit nicely on top of the existing floor mats or you can use them on their own if you’d like. They’re low maintenance & easy to clean.
Cordless Hand Vacuum (Amazon)
Another must-have for keeping the interior clean is a cordless hand vacuum. This rechargeable Black & Decker is very affordable and good enough for most car cleanups.
Matte Black Console Wrap (Amazon)
The Model 3 center console is extremely glossy & a fingerprint/dust magnet. To fix this I got this awesome DIY matte black console wrap kit. The install took about 1 hour and was fairly easy but it did take some patience. Totally worth it though and I love the way it looks and feels now.
Collapsible Sunshade (Amazon)
As an owner of a fully electric vehicle you’ll want to minimize battery usage and this foldable sunshade helps with that. It folds into a small circle & comes with a convenient holder. It blocks the heat from the sun which helps avoid battery drain from the fan kicking on.
Smart Home Lock (Amazon)
The August Smart Home Lock lets you turn your existing door lock into a “smart” lock. With the Model 3, your smartphone is basically your key so to get rid of your keys altogether you’ll want a smart home lock. This one has worked great for me. It has an app so you can lock/unlock your door via Bluetooth.
Bonus products for Aero wheel owners:
Aero Wheel Cap Kit
If your Model 3 has the standard 18″ wheels you’ll want the Tesla Aero wheel cap kit to show off the nice rims underneath.
Suction Cup (Amazon)
If you get the cap kit you’ll also want this suction cup. It helps tremendously when removing the center cap from your wheel when you want to put the Aeros back on.
Wheel Touch-up Paint (Amazon)
If you have the standard 18″ wheels at some point you’ll probably experience curb rash. For a quick fix get this Dupli-Color Dark Shadow Gray touch up paint. It matches the rim color almost perfectly. It’s not a complete 100% fix for curb rash but it does make it look way less noticeable.
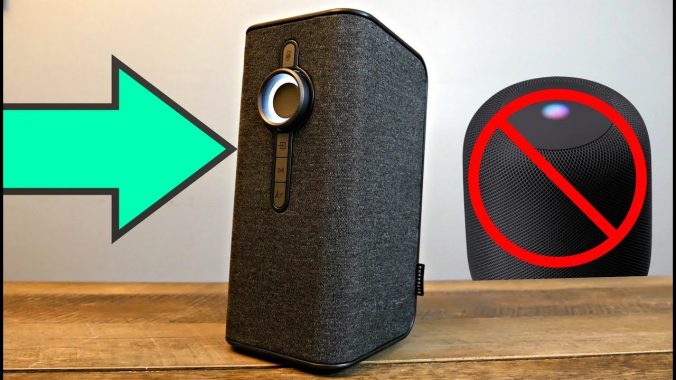
KitSound is a British audio brand, and they recently launched the Voice One speaker in the US. When they asked to sponsor this video I quickly agreed because I wanted to see if there was a true affordable competitor to the new Apple HomePod. Watch the review video above to find out.
The KitSound Voice One starts at $179.99. It is a powerful smart speaker with built-in Amazon Alexa voice service. In the box, which I love the way this box opens by the way, you’ll find the Voice One speaker, 3 different power cords (one each for USA, EU, and UK), along with a 3.5mm aux cable, a remote control, and the quick start guide.
The Voice One speaker is 11” tall by 5” wide and deep and weighs just under 4 lbs. It’s sporting a retro style design with a charcoal colored stain-resistant Nano coated woven grill that gives it a very pleasing look. If you’ve seen some of my previous videos you’ll know that I love gray products. There’s just something attractive about gray and this speaker is no different.
On the front you’ll find a mute & unmute mic button, a volume ring with a tap to talk button in the center, the ring will change colors depending on the current function, below the ring is the input button to change between Bluetooth Aux or Wifi mode, an action button below that, and a KS light that will light up with the beat when the speaker is playing loud music.
On the top there are two far field microphones which work very well for picking up your voice from far away or even during music playback. On the back you’ll find a subwoofer port, along with a very convenient USB port to charge USB devices, and a 3.5mm line-in port for wired inputs.
This is a smart speaker that works with Amazon Music, Apple Music, Spotify, and many other Internet Radio services including Pandora, iHeartRadio, and TuneIn. The setup is super easy, just download the free KitSound app and follow the instructions to connect it to your Wifi network and to your Amazon Alexa account to enable voice commands. The KitSound app is not the most intuitive app in the world, but it does do its job fairly well and I have not experienced any bugs or glitches so that’s always a good thing. From the app you can control playback, change various settings including the bass and treble, set a sleep timer, configure presets, and more. So the app does give you a nice variety of controls.
Speaking of controls, the remote control is an added bonus. It contains the same controls that are on the front of the speaker which is nice, and its most functional use is when the speaker is playing loud music, so instead of trying to scream Alexa, you can just use the remote’s button to enable Alexa. The Voice One also has multi-room technology so you can actually pair up to 8 speakers wirelessly and have them play the same audio across all the speakers at the same time. Great for parties or yeah, parties.
The smart aspect is one of the best features of the Voice One. I love its integration with Amazon Alexa and I also love that it has Spotify Voice Control and Spotify Connect. I’m a big Spotify Premium user so I’m constantly listening to music on Spotify and the Voice One speaker shows up as an available device right in the Spotify app so that’s how I play all my music on this speaker, even though the speaker does have Bluetooth as an option as well. It’s great because when you use a Spotify Connect device like the Voice One, the music streams directly to that device so you’re getting high quality audio plus it saves your phone battery from draining so quickly and it also lets you use your phone for voice calls without interrupting the music.
Using the Amazon Alexa voice service is a very nice touch as well. You can ask it general questions, you can ask it to play certain artists or songs from any of your connected music streaming services, and if you have other Amazon Alexa compatible smart devices in your home, such as my Nest Thermostat, you can control them from the speaker using voice commands.
So we know how smart it is, but what about the audio quality? Well, the other best feature about the Voice One is its 360 degree room-filling sound, which is a result of the two side-facing drivers at 10 watts each paired with the strong bass reflex. So there’s no front-facing speaker which caught me off guard at first, but the side facing drivers really do give it a true stereo-quality sound, and they are very satisfying to listen to. From the highs to the mids to the lows, it’s just a very clean and rich audio output even at very loud volumes. I’m a hip hop head so the majority of what I listen to feels like it was made for this speaker. It definitely shines with rap music and hard hitting beats, but really any genre of music that I’ve played have all sounded very good.
Overall, I’m very impressed with the Voice One. Just the fact that it’s a smart speaker with built-in WiFi & Amazon Alexa makes it desirable. But when you combine that with its high quality immersive audio, the slick looking design, and all the other features like wireless multi-speaker synchronization, the free app, the remote control, the convenient ports, all for less than $180. That’s what makes it a must-have especially if you’re considering an Apple HomePod or any other smart speaker for that matter. For the price, you’re getting a fantastic speaker that I’m sure you’ll love.
I hope you enjoyed my review of the KitSound Voice One smart speaker. Thanks to KitSound for sponsoring this video, and thank you for watching.
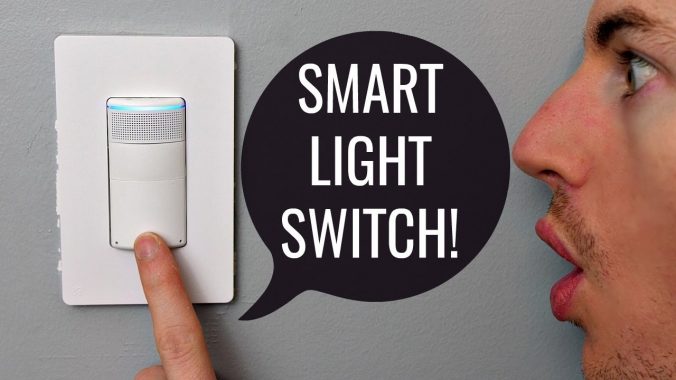
I’ve recently begun to transform my house into a smart house, starting with my wireless security system all the way to my thermostat, and when I was researching the best smart thermostats I saw a particular brand called ecobee that was mentioned quite frequently. So when they reached out and asked if I wanted to do a sponsored video of their latest smart home product called the Switch+ I thought it looked like something you guys would be interested in so I agreed.
The ecobee Switch+ is a smart light switch with far-field voice technology and built-in Amazon Alexa which is the name of Amazon’s virtual assistant and it’s one of the main features of the ecobee Switch+. According to Amazon “The Alexa Voice Service is an intelligent voice recognition and natural language understanding service that allows you to voice-enable any connected device that has a microphone and speaker.” And that’s exactly what the ecobee switch+ is equipped with.
The Switch+ is like a smart personal assistant and simple light switch wrapped into one. With the built-in microphone and speaker for Amazon Alexa, the Switch+ enables invisible voice control in any room it’s installed in. It also provides smart light control by detecting occupancy and daylight. Also, a software update coming this summer will enable the Switch+ to function as a sensor to manage hot or cold spots in a room when the switch is paired with an ecobee thermostat. Like all ecobee products, the Switch+ integrates with Amazon Alexa, Apple HomeKit, Google Assistant, SmartThings, and IFTTT. The Switch+ is $99 in the U.S. and $119 in Canada and it’s available for pre-order starting March 13 and will start shipping on March 26. I’ll leave the link in the description below for you to check out.
First, let’s go over what’s in the box. Inside, you’ll find the main attraction itself the Switch+, along with a wall plate, 4 wire nuts, 2 mounting screws, and the setup guide. The install is fairly simple and only takes about 45 minutes. Even though you can follow the setup guide that comes in the box, it’s probably easier to download the free ecobee app because the app will actually walk you through the entire process and it has helpful videos along the way. The app will also tell you what tools you need and it will do a compatibility check to verify your light switch will work with the Switch+.
Once you’ve verified compatibility, you’ll need to turn off the breaker for the switch you’re installing. After confirming the power is off, remove the old switch from the wall and disconnect the wires. Next, identify and connect the necessary wires to the Switch+. This part took the longest for me so be patient. Once that is done, push the wires back into the wall and screw the Switch+ to the wall. Turn the breaker back on and test out the Switch+ by pressing the button to turn your light on and off. If it works, then the final step is to snap on the wall plate.
Next, you can use the ecobee app to finish setting up the Switch+ by creating your free ecobee account, giving your Switch+ a name & location, and connecting it to your WiFi network. Keep in mind that even though it has built-in WiFi, it does not have Bluetooth enabled at this time. Once it’s fully set up you can control your Switch+ from anywhere using the ecobee app as long as you’re connected to the internet.
On the app home screen you can quickly turn the light on or off using the main button or you can tap the middle icon at the bottom to bring up more controls. the Smart On feature will automatically turn on the lights when someone enters the room. If you enable daylight detection, Smart On will only activate when the room is dark. Smart Off will turn the lights off when no one is in the room, and you can set the off timer to different intervals based on your preference. Another awesome feature is the built-in night light which will automatically glow when the room is dark. And if you have your Switch+ set up as an outdoor light, you can set it to automatically turn on at sunset which is nice.
As I mentioned before, Amazon Alexa is a big part of the Switch+ because it allows you to perform voice commands like asking it to set a timer, read the news, give you the weather forecast, and more. This is all part of ecobee’s “Whole Home Voice” vision to deliver effortless hands-free voice control in every room without dealing with hubs or wires.
To start using Amazon Alexa, first link your Amazon account within the ecobee app. Then download the free Amazon Alexa app and sign in with your Amazon account. Next, add the ecobee skill and authorize Amazon Alexa with your Switch+. Then you can ask Alexa to discover devices, and Alexa should respond with the name of your Switch+.
What’s really cool is the built-in speaker that I mentioned earlier, and if you’re in the US and have Amazon Prime you can tell it to play any song that’s available on Amazon Prime Music and it will play it out of the speaker. Now don’t expect to use this as a high fidelity party speaker for loud music but honestly if you just want to listen to low-level background music while you’re working or studying, this little speaker does the job. You can also listen to iHeartRadio and use Tune-In Radio for audiobooks & podcasts, with support for SiriusXM & Pandora coming soon.
However, the Switch+ does not currently have Spotify integration and as a heavy Spotify Premium user I was a little let down by this. But if you have an Amazon Alexa-enabled Sonos speaker, you can ask Alexa to play music on Spotify that way. I don’t have a Sonos speaker but I was able to add a skill in the Amazon Alexa app that lets me control the playback of Spotify on my iMac which is pretty cool. And that is the key, search the Amazon Alexa app for any skill that you’re interested in and if it’s available you can add that skill to the ecobee Switch+. And you can also control other smart lights in your home if they’re connected to your Amazon Alexa account. I was also surprised at how well the Switch+ picked up my voice from across the room and even when I was playing music pretty loudly it heard me most of the time.
Overall, for $99 I think this is a pretty neat smart device that is perfect for people who want voice-control in their home without adding bulky hubs or wired speakers since this is just a small light switch basically hidden on the wall. The ecobee app is very intuitive and it’s nice that you can use the same app for the Switch+ and ecobee thermostat if you have one. The Switch+ itself is nicely designed and has worked as expected so far. Again if you want to pick this up, the link is in the description below.
Thanks to ecobee for sponsoring this video, and thank you for watching. Be sure to hit the thumbs up if you enjoyed this video and subscribe if you haven’t already to see more tech videos in the future. I will talk to you in the next video.
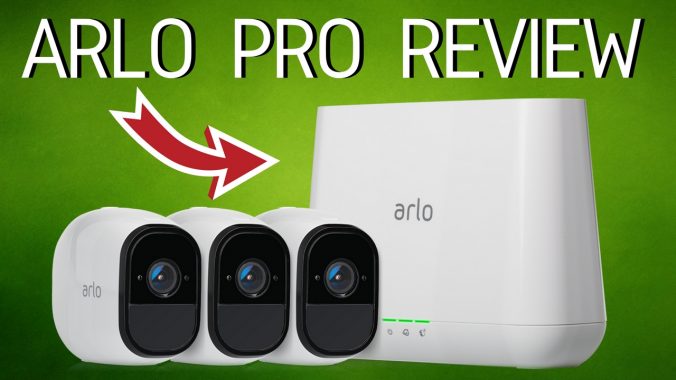
You may have remembered that I bought a house last year and after doing a lot of research I finally bought a security camera system for it. And if you know me well you’ll know that I always prefer wireless over wired. I hate cords and I avoid them at all costs when possible. So that’s why I chose to go with the Netgear Arlo Pro because it’s one of the few security camera systems that is completely wireless. No power cords or data cables. I’ve had this for over a month, and now I want to share my experience with you. This is my review of the Arlo Pro wireless security system.
This is not a sponsored video. I bought this with my own money, but even if it was sponsored I do always give my own honest thoughts and opinions. I will leave a link to the Arlo Pro on Amazon in the description below for your convenience. If you do choose to buy it please consider using that link as it does help out the channel a tiny bit at not extra cost to you.
At of the time I made this video, the 3-camera Arlo Pro system which is what I have is a little over $530. So it is a bit expensive compared to ordinary security systems, but you are getting way more features with it being a smart security system along with the convenience of it being completely wireless. There are options for a 1-camera system all the way up to a 5-camera system depending on your needs.
All the systems come with the free basic plan from Arlo but if you do happen to need more than 5-cameras on a single base station you can add up to 10 cameras and upgrade to the premium plan. The free basic plan supports up to 5 cameras and includes free cloud storage for up to 7 Days. The Premier plan is $100/year and supports up to 10 cameras and includes free cloud storage for up to 30 days. I’m currently on the free basic plan so that’s what my review is going to reflect.
Included in the box are: the base station, the base station power adapter, an ethernet cable, the Arlo Pro cameras along with a rechargeable battery for each, a power adapter and cable to recharge the camera batteries, and magnetic wall mounts with mounting screws. A nice perk is that all the batteries are fully charged when they arrive.
For me the setup was very smooth. The included guide was easy to follow. It doesn’t take long at all and basically consists of downloading the free Arlo app which is compatible with iOS, Android, and Amazon devices. Creating your free Arlo account, connecting the base station to your router, then syncing and mounting the cameras, and you’re done.
Just last week Arlo announced the Arlo Pro 2 which is the newest version of Arlo Pro, and even though it is slightly better in a couple of ways, a lot of the new features depend on the Arlo Pro 2 camera being plugged into power and being indoors. So that’s why I do still recommend just getting this original Arlo Pro system because it is cheaper and you’ll get the essential functionality and features that most people need in a security camera system.
The Arlo Pro cameras are built for indoor or outdoor use. They have a 300-ft line of sight range from the base station. They are IP65-certified weatherproof so they should be fine even in the snow, rain, or heat. It’s been very mild weather since I’ve installed mine so I don’t have any experience through winter but I suspect they’ll be fine here in the Midwest. And since the cameras are completely wireless and have rechargeable batteries inside, they connect to the mounts via the built-in magnets. So all you have to do is install the mount and the cameras just snap to the magnetic mounts which allows you to easily adjust the camera angle and quickly remove the cameras whenever you need to recharge them.
As far as battery life goes, Arlo says a camera battery can last 4-6 months but it really just depends on the camera settings and how much it is recording and detecting motion or sound. Mine have been installed for about 7 weeks, and they’re all right below 60% so if they continue like this they should last around 4 months total on a full charge, and that’s right at the 4-6 month prediction that Arlo has claimed which is good.
The way Arlo Pro works is it’s not designed to be constantly recording and saving video 24/7 nonstop. Instead, Arlo Pro is meant to record short video clips only upon motion detection or sound detection. So even though it’s not constantly saving video, the cameras are constantly active and you are able to live stream any camera at any time from your smartphone or device of choice as long as your device is connected to the internet. That’s another reason I went with Arlo Pro because all the cameras can be managed and viewed via the free app wherever I am.
Here’s a quick overview of how the app and camera system work together.
First I love that the app can be configured to log in automatically with Touch ID on my iPhone. All I have to do is open the app and it logs in with my fingerprint. That is very convenient, and I’m always grateful when an app utilizes Touch ID. On the Devices tab you can see all your different cameras and you can view a live feed by tapping the View button. Under the cameras there’s also a button to trigger the base station alarm. If you tap this Alarm button it will trigger a super loud 100 decibel siren from the base station. So the ability to remotely trigger the alarm is a great feature to have in a security system. The Library tab gives you a daily list to view any recorded clips that are stored in the cloud on your account. You can tap on any video clip to view it and on the free basic plan, you can download and save it any time within 7 days of the clip being recorded. You can also quickly share it or favorite it. The filter icon on the top is a quick way to view certain types of clips, so if I want to see all the clips from my indoor living room camera I can filter to just that camera and it will show me all those clips.
The Mode tab lets you choose between 4 modes: Armed, Disarmed, Schedule, and Geofencing. The Disarmed mode cannot be customized, it just disarms your entire system. However you can customize the other 3 modes. You can really drill down and set all the settings however you’d like. In the Armed mode you can customize the rules for each of your cameras. You can set each camera to record upon motion, sound or both or neither. You can tell it what to do when it detects motion or sound, you can configure it to turn the siren on or not upon detection, and you can set your notification settings. That’s another thing I love about the Arlo Pro is that, if you want it to, it immediately notifies you via a push notification, email or both whenever a camera detects motion or sound. And it does work from my experience with it. It seems to be very successful at detecting motion and noise. For example I always get notifications whenever my cat prances into the living room to play, I’ll get notifications of when a package is left at my door so it has been very reliable for me.
The Schedule mode lets you set a custom schedule of days and times that will automatically arm and disarm your system So if you want your system to automatically arm from 6am to 11pm on weekdays and all day on the weekends, the schedule mode lets you do that.
Geofencing mode will automatically arm and disarm your system whenever your smartphone is within a certain radius of your base station so in theory if you get in your car and drive away from your house and you have your smartphone with you, your system will automatically arm your system as you leave that radius area. Then when you arrive back into the radius area it will automatically disarm your system. I’ve tested out both Schedule and Geofencing modes and they do work as expected.
The camera quality is pretty decent. These have a 720p standard HD resolution, and that’s where the new Arlo Pro 2 cameras have the biggest advantage because those are full HD 1080p. But the good news is the original Arlo Pro system is compatible with Arlo Pro 2 cameras so if you really wanted a 1080p camera you could purchase an Arlo Pro 2 camera and add it to your original Arlo Pro system and it should work. For me, 720p is fine for most situations, but 1080p would come in handy if I really wanted to capture more image detail when necessary.
The cameras have a wide 130-degree viewing angle so they are able to capture a lot inside the frame which is nice. They also have 2-way audio so they have microphones to capture the sound as well as speakers that let you speak into the app on your smartphone and your voice will be projected out of the camera’s speaker. So if you see someone on your porch you get on your app and just be like “Hey I’m your guilty conscious, you should really get off this person’s porch. He probably is very handsome and has broad shoulders.”
If you tap on the gear icon next to your camera you can customize the settings for each camera. From here you can name the camera, turn it on or off, view the battery percentage, see if it’s connected to the base station. In the Video settings you can enable night vision which is pretty decent quality even in the pitch dark, you can rotate the image, and you can change your power management. Since these are just standard HD I set all my cameras to the Best Video setting which reduces battery life but I’d rather have the best video quality possible. However there are other options such as Optimized and Best Battery Life if you prefer longer battery life over video quality.
In the Settings tab you can view all your devices, view your Arlo profile, and grant access which is really nice – this lets you give access to your spouse or whoever you choose so they can download and install the Arlo app and view all your cameras too.
Since the cameras are magnetic I do recommend installing them in high places that are out of reach so that people can’t just pull the cameras off so easily. However if you do need to install them in a place within a person’s normal reach, you can purchase screw mounts so the cameras are actually screwed in to the mount which makes it harder for someone to just pull the camera off. I’ll put a link to these along with some other cool Arlo Pro accessories in the description below.
So after using this for over a month I definitely think the Arlo Pro system is the best wireless security camera system for people who want something that’s easy to set up and use, and something that is completely wireless. It has worked exactly as expected for me. The app is intuitive – it hasn’t crashed or have bugs in the software. All the motion/sound detection rules seem to work as expected. I get instant notification on my phone wherever I am, it has free cloud storage with the ability to download and save videos anytime within 7 days. The cameras are weatherproof and work indoors and outdoors, and it comes with a base station with the ability to trigger alarm based on rules or on demand. It’s just a great security camera system and so far I’ve been very satisfied with it. Again, if you want to get this on Amazon I’ll leave the link in the description below. Thank you for watching. My name is Andy, and I will talk to you in the next one.
If you’ve seen my previous videos you’ll know that I love Logitech mice. I still own the Performance MX (Amazon) which is a great video editing mouse, and I’ve always said that the M570 (Amazon) is one of the best ergonomic trackball mice. Well now after 7 years, Logitech has finally released a new and improved wireless trackball which could easily become the best ergonomic mouse on the market. Logitech was nice enough to reach out and ask if I wanted to try an early test unit so here is my hands-on first look at the Logitech MX Ergo wireless trackball (Amazon).
The MX Ergo (Amazon) costs just under $100 and I’ll leave a link to it in the description below. In the box there’s the MX Ergo trackball mouse, a charging cable, a Logitech unifying receiver, and probably the most important piece, this magnetic metal hinge. This hinge snaps on to the bottom of the MX Ergo and lets you use the trackball at two different angles based on your own personal preference. This is definitely the best feature about this trackball in my opinion because the ability to switch between angles is great for improving wrist posture. The MX Ergo also claims to reduce muscular strain by 20% compared to a standard mouse.
The overall design is excellent. It’s definitely made of high quality materials. It’s big enough and feels solid in my hand. The way it’s sculpted provides full support for the palm to rest on and scrolling isn’t awkward or tiring. The bulk of the mouse is made of a soft rubber which gives a nice comfortable grip. The bottom of the hinge has a good non-slip finish on it which helps the trackball stay in position when using it. It of course has left and right click buttons on top. The scroll wheel can not only scroll up and down, but it can also tilt for left and right scrolling, and it can also be pressed down to click. There’s an Easy-Switch button on top that lets you instantly switch between two computers without re-pairing, and you can also copy & paste data between the two computers with Logitech Flow. Both of these features require the free Logitech Options software. This software is not required to use the trackball, but it does give you more features and customization tools.
The trackball itself has been smooth and accurate so far, and it doesn’t feel loose or anything. But for those of you who aren’t familiar with using a trackball, there is a convenient precision mode button near the ball so you can easily adjust the cursor speed and sensitivity allowing for faster and more precise control.
The MX Ergo is compatible with the latest versions of Windows and Mac, and even though it comes with a USB unifying receiver that allows you to wirelessly connect up to six Logitech devices, the MX ergo does have built-in Bluetooth if you’d rather just use that instead of using the unifying receiver.
It has a rechargeable battery inside that can potentially last up to four months on a full charge, depending on usage. But what’s really cool is that just one minute of charging usually gives enough charge for a day’s worth of work. That is super convenient for a wireless trackball.
So that’s my first look a the MX Ergo. This wasn’t a full review because I’ve only had it for a few days, but so far I’m really impressed and it’s something that I will continue to use as my primary mouse when I’m not using my Apple Trackpad. Let me know what you think in the comments below. Thanks for watching, and I’ll talk to you guys in the next video.